2 BUDGET ESTIMATING
2.1 ESTABLISHING A BUDGET
How would you start in establishing a budget?
|
Well, first you need to decide how much you want to spend and how much you can afford to spend.
This may determine the size and type of dwelling you can construct, but to a large extent, the location of your land will be a major consideration. Whilst it is not always an absolute, a good rule of thumb is that the cost of the dwelling should equal the land value. |
That is if you purchase a block for $180,000.00 then a build cost of $180,000.00, would put you in a price range which would neither under nor over capitalise your property.
Do not let this be the only deciding factor, look at what properties are selling for in the area and consider the type, size and quality of the homes.
Given the above, it is easy to determine how much you should spend.
What is more difficult is the process to determine how much your vision is going to cost to build.
While we could go into many different ways of working out an estimate, there is a relatively simple rule to check your figures.
All constructions can be related back to a square meter construction cost.
This will vary given a range of variables including:
Location
Several location related issues arise when you consider the cost of construction.
Access to the site is a factor and the associated transport costs or the difficulty in getting materials and or equipment onto site.
By way of example, consider the increase in cost of getting equipment onto an extremely steep site or one that is located many miles from services or suppliers.
To a lesser extent, homes built in prestige areas may command a higher square meter rate due to a perceived ability to pay, not fair, but a fact of life.
Quality of Fittings
This is obvious, but the higher the quality of the fittings, fitments and fixtures you specify, the greater the cost of the dwelling.
All items you specify can vary in price from the basic to the extraordinary.
A set of taps for over your bath can range from $80.00 to $1200.00 and more, or a cooktop and range in the kitchen can vary from as little as $400.00 to as much as $20,000.00 plus.
Paint is another area that people often overlook as a major contributor the overall cost of the project.
An average quality paint system will cost around $45.00 per square meter to over $180.00 per square meter to supply and apply the finishes.
In most cases this is not a huge issue, but you do need to be aware that the range of materials available is enormous, and anything can be achieved at a price.
However, you do not need to spend anywhere like the top end figures we have quoted to realise a high quality job.
Perhaps even more so, owner builders considering a very high end finish, can realise enormous savings through good management and sound tendering and astute purchasing.
Big savings can be made at all budget levels.
Availability of Tradespersons
Many times this will be out of your control, but if you can hold off and not build during ‘building booms’ you will find more reasonable prices during quieter times.
Do not let this be the only deciding factor, look at what properties are selling for in the area and consider the type, size and quality of the homes.
Given the above, it is easy to determine how much you should spend.
What is more difficult is the process to determine how much your vision is going to cost to build.
While we could go into many different ways of working out an estimate, there is a relatively simple rule to check your figures.
All constructions can be related back to a square meter construction cost.
This will vary given a range of variables including:
- Where the project is located
- The quality of the fittings
- The availability of tradesperson in the area at the time
- The complexity of the construction
Location
Several location related issues arise when you consider the cost of construction.
Access to the site is a factor and the associated transport costs or the difficulty in getting materials and or equipment onto site.
By way of example, consider the increase in cost of getting equipment onto an extremely steep site or one that is located many miles from services or suppliers.
To a lesser extent, homes built in prestige areas may command a higher square meter rate due to a perceived ability to pay, not fair, but a fact of life.
Quality of Fittings
This is obvious, but the higher the quality of the fittings, fitments and fixtures you specify, the greater the cost of the dwelling.
All items you specify can vary in price from the basic to the extraordinary.
A set of taps for over your bath can range from $80.00 to $1200.00 and more, or a cooktop and range in the kitchen can vary from as little as $400.00 to as much as $20,000.00 plus.
Paint is another area that people often overlook as a major contributor the overall cost of the project.
An average quality paint system will cost around $45.00 per square meter to over $180.00 per square meter to supply and apply the finishes.
In most cases this is not a huge issue, but you do need to be aware that the range of materials available is enormous, and anything can be achieved at a price.
However, you do not need to spend anywhere like the top end figures we have quoted to realise a high quality job.
Perhaps even more so, owner builders considering a very high end finish, can realise enormous savings through good management and sound tendering and astute purchasing.
Big savings can be made at all budget levels.
Availability of Tradespersons
Many times this will be out of your control, but if you can hold off and not build during ‘building booms’ you will find more reasonable prices during quieter times.
|
Many times this will be out of your control, but if you can hold off and not build during ‘building booms’ you will find more reasonable prices during quieter times.
Interest rates tend to even themselves over the period of an average loan, but those who astutely lock in to a fixed rate can save real money over the life of the loan. This is often aligned to the building cycle and you need to watch closely what is going on and the projected movements in building activity. |
When a tradesperson has plenty of work, it is common to ‘high ball’ quotations, that is, submit an unrealistically high tender.
In most cases, the tradesperson does not really want the work, and will only undertake the project if they realise a premium.
Complexity of the Construction
It is easy to estimate the labour and material costs for simple constructions.
Traditional building methods have well established associated labour rates, and any tradesperson worth their salt will be more than competent to provide you with an offer during the tender process.
More complex structures and non conventional building methods will generally be more expensive, partly due to the increased labour content and partly due to the possibility of the unknowns.
Unique and innovative design features can certainly add value and appeal to your new home, but can lead to increased costs and in extreme cases, limit your market at the time of resale.
Producing an Initial Budget
Once you have decided on the design and the quality of the construction, you are ready to produce a preliminary budget.
This can be achieved quite simple through a simple square meter formula multiplied by a rate established considering all the factors previously discussed in this section.
This can be fine tuned, but we do recommend engaging an experienced builder or quantity surveyor to develop a realistic estimate based on the square meter rate, knowledge of the current labour market and trade availability.
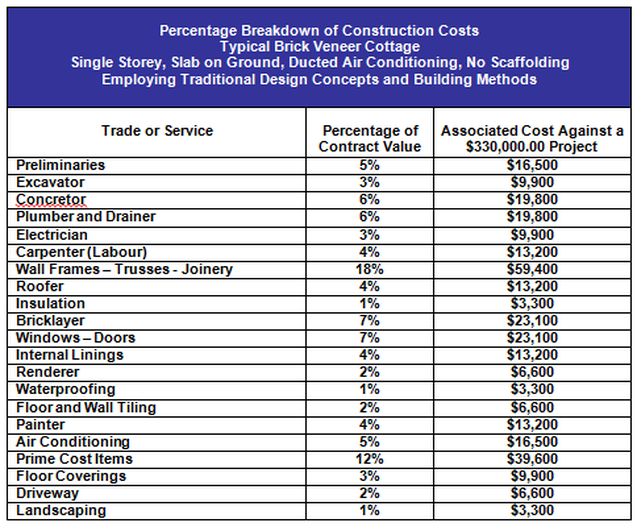
As a guide, once an accurate budget estimate is established, an estimate of the value of each trade, service and supply can be determined using the average weighting of each structural component against the total estimate.
For example, as a rule, the value of the plumbing on a domestic construction project is in the order of 8% of the total value of the works, therefore for a project with an estimated build value of $220,000.00, you could expect plumbing quotations to be around $17,600.00.
The above example is only an approximation, it will vary dependant on extraordinary items.
A full breakdown on the values of specific trades against total contract value is provided below, it is a guide only and can vary significantly due to any number of factors including:
They are a good starting or reference point.
This table is best used as a benchmark to determine then justify larges departures from the amounts listed below.
We are unable to cover all the methods of construction in one table, this information is based on a ‘typical’ brick veneer, single storey slab on ground cottage with ducted airconditioning.
It assumes traditional design and building methods/concepts are used in the construction, similar to what you would get in an off the shelf project home.
Scaffolding is not considered and should always be treated as a cost outside the scope of developing a budget in this way.
To establish your initial budget estimate, use a square meter rate to ball park expected construction costs.
That is, a 250 square meter home budgeted at $1150.00 per square meter should come in at around $287,500.00
In most cases, the tradesperson does not really want the work, and will only undertake the project if they realise a premium.
Complexity of the Construction
It is easy to estimate the labour and material costs for simple constructions.
Traditional building methods have well established associated labour rates, and any tradesperson worth their salt will be more than competent to provide you with an offer during the tender process.
More complex structures and non conventional building methods will generally be more expensive, partly due to the increased labour content and partly due to the possibility of the unknowns.
Unique and innovative design features can certainly add value and appeal to your new home, but can lead to increased costs and in extreme cases, limit your market at the time of resale.
Producing an Initial Budget
Once you have decided on the design and the quality of the construction, you are ready to produce a preliminary budget.
This can be achieved quite simple through a simple square meter formula multiplied by a rate established considering all the factors previously discussed in this section.
This can be fine tuned, but we do recommend engaging an experienced builder or quantity surveyor to develop a realistic estimate based on the square meter rate, knowledge of the current labour market and trade availability.
As a guide, once an accurate budget estimate is established, an estimate of the value of each trade, service and supply can be determined using the average weighting of each structural component against the total estimate.
For example, as a rule, the value of the plumbing on a domestic construction project is in the order of 8% of the total value of the works, therefore for a project with an estimated build value of $220,000.00, you could expect plumbing quotations to be around $17,600.00.
The above example is only an approximation, it will vary dependant on extraordinary items.
A full breakdown on the values of specific trades against total contract value is provided below, it is a guide only and can vary significantly due to any number of factors including:
- Availability of trade contractors at any given time
- Specific design features of the proposed dwelling
- Material availability
- Site considerations
- Covenants
They are a good starting or reference point.
This table is best used as a benchmark to determine then justify larges departures from the amounts listed below.
We are unable to cover all the methods of construction in one table, this information is based on a ‘typical’ brick veneer, single storey slab on ground cottage with ducted airconditioning.
It assumes traditional design and building methods/concepts are used in the construction, similar to what you would get in an off the shelf project home.
Scaffolding is not considered and should always be treated as a cost outside the scope of developing a budget in this way.
To establish your initial budget estimate, use a square meter rate to ball park expected construction costs.
That is, a 250 square meter home budgeted at $1150.00 per square meter should come in at around $287,500.00
**Note:
These figures are a rough indicator only and are most useful in identifying large variations in contractors quotations.
For example, if the plumbing prices came in at 25% of the total budget estimate, you would need to look at what had been specified or the scope of works against what the tenders had included. There may be an error in the specifications/scope of works, or there may be factors affecting the price which you had not considered.
Each project will be different but this is a good place to start.
One of the most difficult things for an owner builder to achieve is a realistic budget to suit their project. Whilst it is not possible for our staff to teach “a novice” how to prepare a bill of quantities and a full estimate for their building project in a short time, we will endeavour to provide you with the information that will assist you in estimating your materials and labour costs.
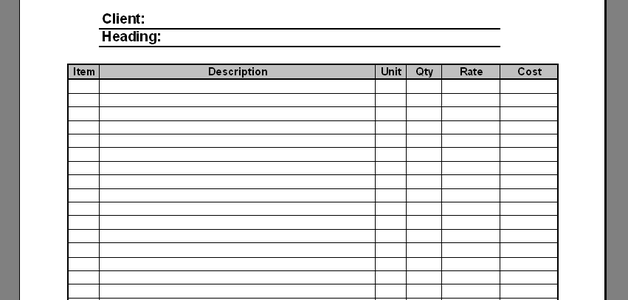
Firstly, in order to prepare your lists you should use our recommended billing sheet as shown below.
The need to discipline yourself when estimating or doing a ‘take off’ is imperative.
The term ‘take off’ is the activity of looking at your plans, reading a measurement or instruction then writing the details from the plan to a schedule or estimating sheet.
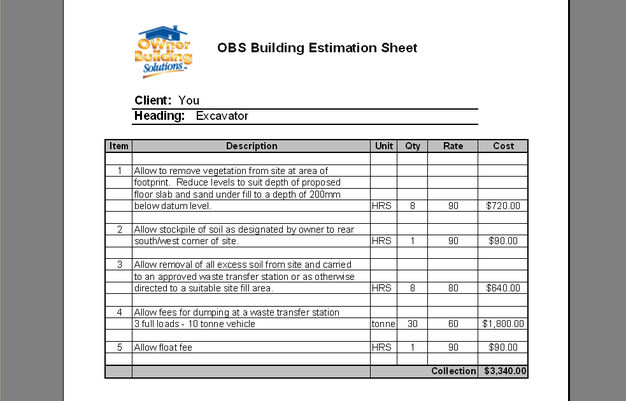
The O.B.S. building estimation sheets provided will help you orginise your work and your costs. We believe it is best if you use a separate sheet for each profession, trade or supply component.
Lets prepare a sample list of pages;
As you can see it’s quite a breakdown.
Each page itemises the subject and works through the steps from the first to the last listing description of works or goods and allowing a cost to each.
The term ‘take off’ is the activity of looking at your plans, reading a measurement or instruction then writing the details from the plan to a schedule or estimating sheet.
The O.B.S. building estimation sheets provided will help you orginise your work and your costs. We believe it is best if you use a separate sheet for each profession, trade or supply component.
Lets prepare a sample list of pages;
- Cover page
- Preliminaries
- Demolition
- Excavator
- Concretor
- Plumber/Drainer
- Gasfitter
- Electrician
- Carpenter
- Carpenter
- Carpenter
- Roof Plumber
- Metal Worker
- Bricklayer
- Internal Linings
- Renderer
- Floor and Wall Tiler
- Painter
- Prime Cost Item
- Scaffolding
- Mechanical Services
- Collection
As you can see it’s quite a breakdown.
Each page itemises the subject and works through the steps from the first to the last listing description of works or goods and allowing a cost to each.
Obviously the wording and structure will change to suit the particular project.
The difficulty an inexperienced owner builder will find is identifying the sequence and estimate of time each portion or segment will take.
Building Measurements & Quantities
The difficulty an inexperienced owner builder will find is identifying the sequence and estimate of time each portion or segment will take.
Building Measurements & Quantities
Sisalation
For wrapping the building to meet energy requirements.
Solarwise & Super Tough are two commercial products, however there are others,
Normally purchased in rolls of different lengths
e.g. 60m roll Super Tough @ 1350 wide would cost $97.00 + GST or
Cost per 60m roll by 1350 wide of a Breathable type, (to be used in cladded buildings) cost $104.70 + GST
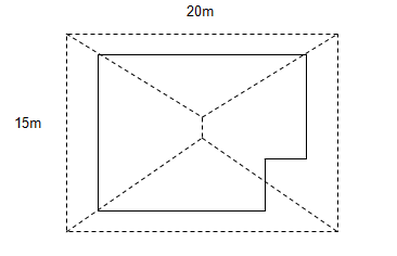
Therefore, a house 300m² say 20m x 15m would require approx 140m (2 runs) + laps + returns.
Say allow 160m or 3 rolls @ 60m.
Total 180m of Breathable type for use on a cladding wall.
rolls (60mm x 1350mm) @ $104.70 + GST
Sub Total $115.17 x 3 = $345.51
Example
Roof Area (rule of thumb only)
Total area of roof in plan.
20m (length) x 15m (width) = 300m²
Say the roof has a 25° pitch, rule of thumb says add 30%
300m² x 30% = 390m²
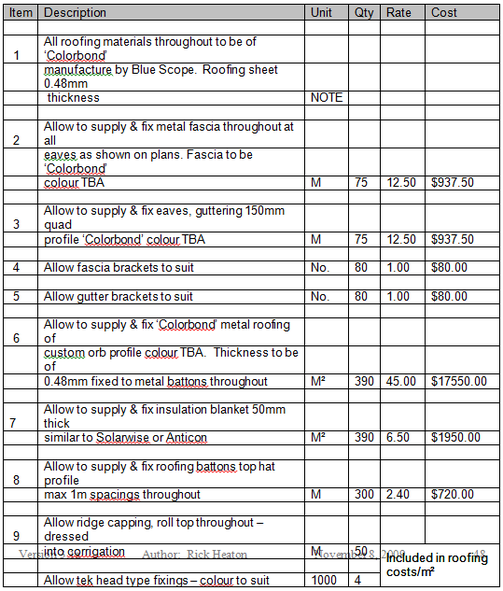
Rate to supply and fix ‘Colorbond’ is around $45/m² which will normally include ancillaries, e.g. ridge capping, barges, valleys.
Therefore, 390m² x $45.00 = $17,550.00
Plus insulation blanket 50mm thick @ $6.50/m²
Supply & fix – 390m² x $6.50 = $2335.00
Lets now look at your estimating sheet.
While we are talking about roofing – some more useful information.
A sheet of custom orb roofing iron has an effective cover of 762mm.
Example
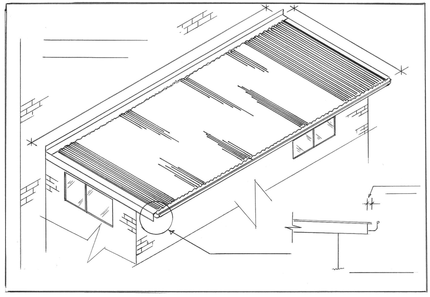
A skillon roof measures on plan
This would estimate out at:
Sheet length 8400mm + 50mm overhang to gutter = 8450mm
The roof is 18m in length or 18000mm given there is a 1000mm in a metre.
18000 ÷ 762 = 23.6 sheets (say 24)
Therefore you would order 24 sheets of ‘Colorbond’ custom orb roof sheeting @ 8450mm long.
Sheet length 8400mm + 50mm overhang to gutter = 8450mm
The roof is 18m in length or 18000mm given there is a 1000mm in a metre.
18000 ÷ 762 = 23.6 sheets (say 24)
Therefore you would order 24 sheets of ‘Colorbond’ custom orb roof sheeting @ 8450mm long.
Let’s calculate the amount of timber or steel it takes to provide 1m² of wall carcassing.
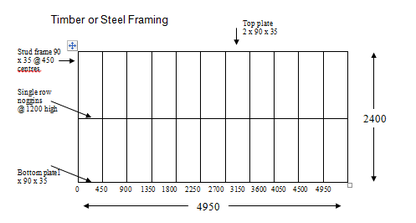
If we calculate from a larger section say 2.4m high 4.95m long, studs @ 450 centres.
If we calculate from a larger section say 2.4m high 4.95m long, studs @ 450 centres.
Total area is 12m²
Therefore, if we purchased 50m of timber @ $3.50/m = $175.00 ÷ 12m²
= $14.60m² (say $15.00) material cost. If you were to include a labour cost per m² say an amount of $20.00, your total cost of materials and labour per m² framing would be ($15.00 + $20.00) $35.00 per m².
A quick calculation on establishing the amount of timber in lengths you require to a wall frame
Example
Wall is 18m long 2.7 high
18 x 2.7 = 48.6m² - say 50m² x 4m = 200 linear metres of timber
Plus some waste = 204 ÷ 6m lengths = 34 lengths @ 6m
This may seem like a convoluted way of doing it however, if you can accept that it takes approx 4m of framing to equal 1m², you can calculate the amount of timber or steel by measuring the total m² of your works, but don’t forget you have many areas where it requires additional studs, e.g. at openings, load areas etc. Always allow for extra materials say 2%.
Previous example 200m x 2% = 4 = 204m timber required.
Most house frames today are prefabricated. This includes steel or timber framing so it seems futile to bother to calculate. However you might find it more cost effective to buy your timber in lengths, cut and make it on site, we refer to this as stick framing.
You will need to do your own comparisons to decide which way to go.
With roof trusses you would probably be wasting your time building your roof frame on site if a truss can be manufactured. What makes it more difficult is finding a chippie (carpenter) who has the skills to pitch a roof conventional style (unfortunately).
Client: You
Heading: Roof Plumber
Footings – Slab – Piers
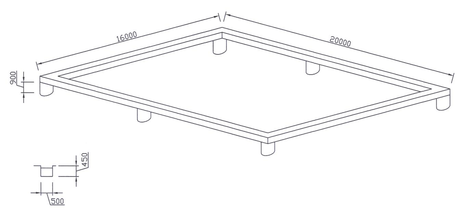
Footings - How many cubic metres of concrete will it take to pour this footing?
Formula V = L x B x D
m³ = (20 x 2) + (16 x 2) x .5 x .45
m³ = (40 + 32) x .5 x .45
m³ = 72 x .5 x .45
m³ = 16.2
Where V = volume in m³
L = Length
B = Breadth
D = Depth
Piers – there are 6 piers @ 600m (diameter) @ 900 deep
Formula V = D² x .78 x H
m³ = .600² x .78 x .90
m³ = .36 x .78 x .9
m³ = .252 cubic metre of concrete/pier
Where V = volume in m³
D = Diameter
.78 = Factor
H = Height or depth
There are 6 piers 6 x .252 = 1.51m³ required – order would be 1.6m³
Slab
Formula V = L x B x D
m³ = 20 x 16 x .100
m³ = 320 x .1
m³ = 32 cubic metres of concrete
Where V = volume in m³
L = Length
B = Breadth
D = Depth
Concrete required for this project – say 50 cubic metres
Formula V = L x B x D
m³ = (20 x 2) + (16 x 2) x .5 x .45
m³ = (40 + 32) x .5 x .45
m³ = 72 x .5 x .45
m³ = 16.2
Where V = volume in m³
L = Length
B = Breadth
D = Depth
Piers – there are 6 piers @ 600m (diameter) @ 900 deep
Formula V = D² x .78 x H
m³ = .600² x .78 x .90
m³ = .36 x .78 x .9
m³ = .252 cubic metre of concrete/pier
Where V = volume in m³
D = Diameter
.78 = Factor
H = Height or depth
There are 6 piers 6 x .252 = 1.51m³ required – order would be 1.6m³
Slab
Formula V = L x B x D
m³ = 20 x 16 x .100
m³ = 320 x .1
m³ = 32 cubic metres of concrete
Where V = volume in m³
L = Length
B = Breadth
D = Depth
Concrete required for this project – say 50 cubic metres
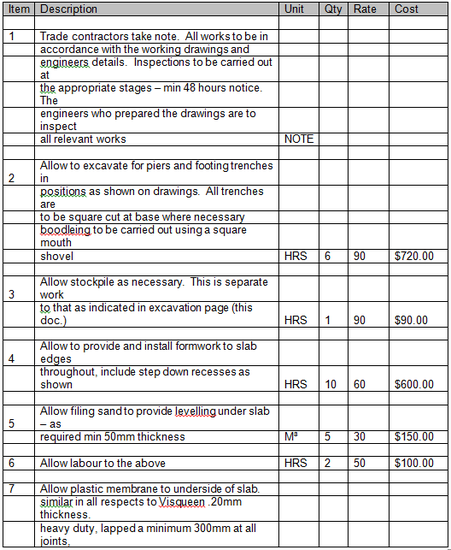
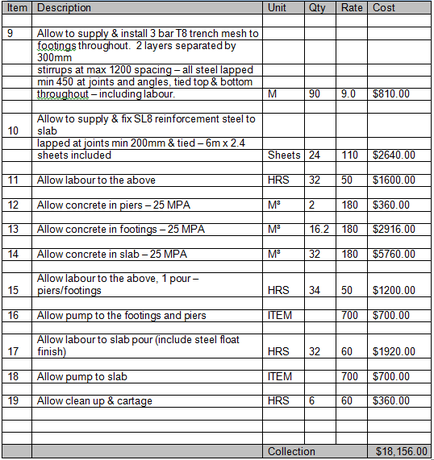
Other components to be allowed for in this trade estimate:
Sand filling
Plastic membrane
Bar chairs
Starter rods
Steel fabric (sheets)
Ties
Formwork
Excavation
Concrete pump
Excavator – levelling
Excavator – trenches
Excavator – Piers
Labour cost
Client: You
Heading: Concreter
Sand filling
Plastic membrane
Bar chairs
Starter rods
Steel fabric (sheets)
Ties
Formwork
Excavation
Concrete pump
Excavator – levelling
Excavator – trenches
Excavator – Piers
Labour cost
Client: You
Heading: Concreter
ABACUS TRAINING Building Estimation Sheet
Client: You
Heading: Concreter continued
Client: You
Heading: Concreter continued
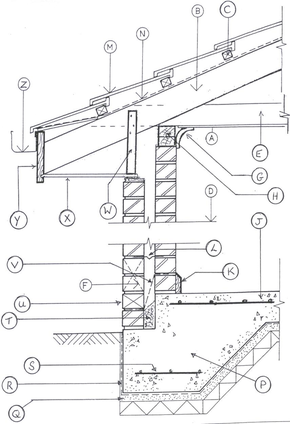
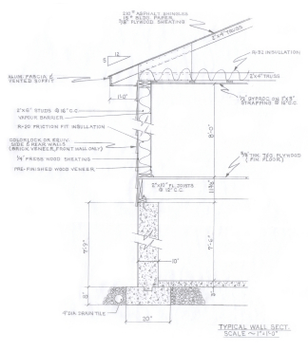
Sectional view – Cavity Brick Construction
A Ceiling lining (10mm plasterboard)
B Truss – Rafter
C Tile Batten
D Cut section
E Bottom chord of truss
F Brick vent
G Ceiling cornice
H Top plate (2 x 90 x 35)
J Reinforcement fabric steel (F82) or (SL8)
K Skirting (timber)
L Brick tie (cavity)
M Roof tile
N Insulation – sarking
P Monolithic slab – concrete combined footing
Q Sand bed filling
R PVC membrane
S Trench Mesh
T Grout fill in cavity
U Weep hole
V PVC damp course
W Tomb – timber hold down for soffit
X Soffit lining
Y Fascia – timber
Z Quad guttering - metal
2.2 PLAN READING
Plans, working drawings and associated specifications form the basis of your construction and govern the way in which the project will be scheduled and indeed managed.
|
They provide the information needed by each of the trades and suppliers to ensure what is offered in their quotations, matches what you expect and what the authorities have approved.
Approved plans are a legal document, and the accompanying specifications will be integral to any contract you have entered into with suppliers and contractors. In general, your plans will as a minimum, include the following information: |
- The location of the building on the site
- The location and size of the spaces in the building
- The materials to be used
- Fittings, fixtures and finishes
- Bracing Details (wind loading)
- Window and Door Schedules
- Foundation and Footing details
- Locations of services (gas, water, drainage, electrical etc.
2.2.1 CONVENTIONS
Drawings are produced in line with standard conventions, a “common language” if you like that is readily understood by everyone in the building trades.
These conventions include things like line thickness, linetypes, cross hatching, scales, views, orientations, title blocks, projections, acronyms and abbreviations, all designed to clearly state the intent of the design.
These conventions are typically consistent on a worldwide basis and language barriers aside, you should be able to travel to Canada, the U.S. or the U.K., pick up a set of drawings and understand the content.
2.2.2 PROJECTIONS
Whilst in most cases, a typical domestic dwelling will use a simple 2D presentation to convey the information.
They will generally include:
- Plan View
- Elevations
- Sections
This allows the owner or the builder to get a better feel for the finished product.
In the past this was only achieved through expensive and time consuming artist’s impressions.
2.2.3 VIEWS and CONSTRUCTION DRAWINGS
Plans that would form a set of drawings for a domestic dwelling would include:
- Site Plan
- The site plan is a vertical plan view of the building site.
- It will generally show the physical dimensions of the site and the location of proposed or existing structures.
- Additionally the site plan will allow identification of the Real Property Description (RPD), area of the allotment, access roads, service and utility locations or connection points, contour lines and other significant physical or geographic features.
Existing trees to be saved, existing trees to be removed and significant proposed planting may also be included.
The site plan can be developed to determine the required amounts of cut and or fill allowing accurate estimations of excavations or imported fill.
Site plans are normally drawn at a scale of 1:200 .
- Foundation Plans
Often these are prepared by the geotechnical engineer and are based on the findings of soil samples and bearing tests.
Based on these reports and the design of the dwelling, the foundation and footing plans can be prepared.
The foundation plan will normally be drawn at a scale of 1:100 and will include the following information:
- Depth, width and location of all strip footings
- Size and location of piers, beams and thickening
- Location and type of foundation walls if required
- Thickness and strength of the concrete slab
- Size and type of reinforcement materials including ligatures, fabric mesh
- Set downs for shower, bathrooms and other wet areas
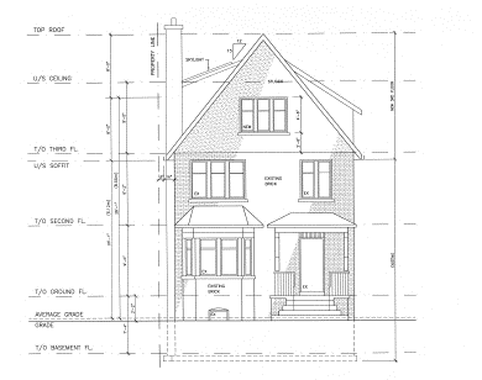
- Elevations
Traditionally these would have been described as Northern, Southern, Eastern and Western Elevation.
Recent times have seen a departure from this convention with the elevation more likely to be described as 1, 2, 3 and 4 with a symbol or “rose” to provide orientation.
Normally elevations will be drawn at a scale of 1:100
Information shown on an elevation will include:
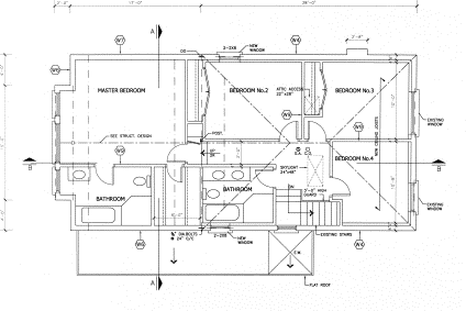
The floor plan is the heart of the working drawings, it displays the overall shape and size of not only the dwellings external walls, but also the layout, design, orientation, access and size of individual rooms.
A visit to site will generally see contractors referring primarily to the plan view for the location and dimensions of the project.
- Windows and doors to external walls
- External cladding
- Roof slope, pitch and design features
- Eaves overhang
- Plan View
The floor plan is the heart of the working drawings, it displays the overall shape and size of not only the dwellings external walls, but also the layout, design, orientation, access and size of individual rooms.
A visit to site will generally see contractors referring primarily to the plan view for the location and dimensions of the project.
Additionally the plan will normally include:
view is developed as though the proposed structure was sliced from the roof peak to the base of the footings.
It allows a graphical display of the structure and building methods to be used during the construction.
Sectional Elevations are generally drawn at a scale of 1:100 and will show:
- Dimensions
- Wall types and thicknesses
- Position of openings, doors, windows etc
- Roof outline and style
- Sections
view is developed as though the proposed structure was sliced from the roof peak to the base of the footings.
It allows a graphical display of the structure and building methods to be used during the construction.
Sectional Elevations are generally drawn at a scale of 1:100 and will show:
- Height of floor above ground level
- Ceiling heights
- Joinery lines or heights
- Depth of footings
- Roof framing type (eg trusses)
Sectional Details are provided to show specific construction details and will be drawn at much larger scales like 1:50, 1:20, 1:10. More intricate and detailed works may require a drawing at full size or 1:1.
A bracing plan is normally drawn at a scale of 1:100, it may be as simple as a single line drawing which locates and defines the bracing type, fixing and distribution throughout the structure.
Ply bracing, solid wall, timber features, hardboard and metal bracing are all detailed and the associated computations are included to demonstrate compliance of the design with consideration to wind loading, roof style, and geographic or physical development affecting the site.
The calculations are developed for two directions and are based on spacing, fixing and rigidity of the bracing type.
This drawing will if required include tie down details often developed as a schedule indicating the method of fixing or tying structural framing members to each other, from the roof sheeting to the footings.
Services are often detailed in separate plan views indicating location, type and size of services, pipe work, cabling, outlets and connections.
When you are determining your preliminary sketches and designs, you should indicate at least the location of power outlets, coaxial cables, telephone points and exterior taps.
Using this as the basis of their design, the engineer, draftsperson or architect can establish service sizing and any other requirements or considerations.
- Bracing Plan
A bracing plan is normally drawn at a scale of 1:100, it may be as simple as a single line drawing which locates and defines the bracing type, fixing and distribution throughout the structure.
Ply bracing, solid wall, timber features, hardboard and metal bracing are all detailed and the associated computations are included to demonstrate compliance of the design with consideration to wind loading, roof style, and geographic or physical development affecting the site.
The calculations are developed for two directions and are based on spacing, fixing and rigidity of the bracing type.
This drawing will if required include tie down details often developed as a schedule indicating the method of fixing or tying structural framing members to each other, from the roof sheeting to the footings.
- Roof sheets to roof battens
- Roof battens to rafters
- Rafters to top plates
- Top plates to studs
- Studs to bottom plates
- Bottom plates to slab and footing system
- Electrical and Plumbing Layouts
Services are often detailed in separate plan views indicating location, type and size of services, pipe work, cabling, outlets and connections.
When you are determining your preliminary sketches and designs, you should indicate at least the location of power outlets, coaxial cables, telephone points and exterior taps.
Using this as the basis of their design, the engineer, draftsperson or architect can establish service sizing and any other requirements or considerations.
2.2.4 INDENTIFYING DRAWINGS
Whilst it is a feature little seen on drawings these days, the inclusion of a cover page with a drawing index is invaluable in quickly referencing and accessing information on site.
In the absence of an index system, you will need to check the title block on each drawing to establish what information is located on the sheet.
The Title Block may include:
- Client details
- Project details
- Project location
- Consultant details
- Drawn by
- Checked by
- Issue or revision code
- Scale
- Date
- Drawing number
- Associated drawings
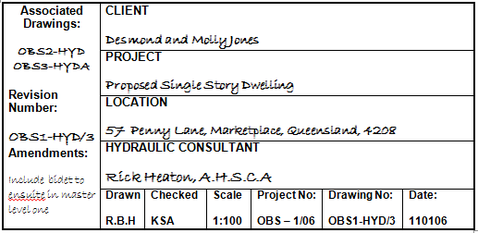
TYPICAL TITLE BLOCK
In this case, the clients are Desmond and Molly Jones, who are having built a single storey domestic dwelling at 57 Penny Lane, Marketplace, Queensland.
The drawing is related to the hydraulic design for the property and is associated with two other drawings, OBS2-HYD and OBS3-HYD.
The drawing is the third revision and has been amended to include a bidet in the ensuite to the master bedroom.
It is extremely important to ensure all contractors and consultants are in receipt of the latest versions of any drawings that will affect their contracted works and that they are aware of any variations which have occurred as a result of these changes.
It is the responsibility of the Owner Builder to ensure any variations to the contract are agreed to, signed by all affected parties and maintained in the project record keeping system.
A well administered project will include the use of a document transmittal system and register to ensure all contractors have received and understood the latest documentation including amendment to working or construction drawings.
2.2.5 SCALE
Scale allows the designer to maintain each component included in the drawing to appear in their appropriate proportion and location.
As previously stated, the scale will be determined by the level of information that is required to be displayed to the reader, ensuring clarity of the instructions or information.
The scale is determined by:
- Type of information to be communicated
- Complexity of the item, fitment, fixture or structure being drawn
- Size of the drawing sheet used
- A balance of time and cost of the drawing production
Because buildings and properties are large, scale drawings need to be used.
To accurately interpret information on plans, it is helpful to be able to read a scale rule.
A scale rule is the same as an ordinary rule in that it will have interval marks at 1mm apart.
A longer line is included at 5mm intervals and an even longer and more prominent line at the 10mm interval.
The 10mm mark is called the “graduation number or index”, this number indicates the “scaled up value rather than the true length.
We recommend using a Kent64M scale rule, this includes all the normal scales that would exist on a set of house plans.
Make certain when using the rule that the scale indicated matches the scale shown on the drawing (usually in the Title Block).
2.2.6 DIMENSIONING
A dimension provides exact details on the physical size of an object on a drawing and is most commonly shown in millimeters (mm).
As a rule and by convention, dimensions will be an overall length of the projection at provided the furthest from the drawing, working in as running dimensions to the smallest dimension on that projection being located closest to the drawing.
Dimensions can be either naturally centered, ‘forced’ or outside the associated dimension line, but in all cases must be easily identifiable with the related structure or building component.
2.2.7 NOTES, LETTERING, ABREVIATIONS AND SYMBOLS
As we trend more and more to fully specified drawings which replace the written specification, the notes, schedules, tables and explanations provided on the drawing take on an increasing importance.
Notes provide clearer detail on items that are difficult to draw, abbreviations and symbols save time and space on the drawing, but should be accompanied by an explanatory legend.
Standard abbreviations and symbology must be used and these are detailed in Australian Standard 1100.301.
2.2.8 WINDOWS AND DOOR CONVENTIONS
The following important rules are necessary when describing or ordering windows from a drawing:
· Size
When describing a window, it is convention to specify the height first and then the width.
An 1800 x 2400 window is therefore 1800mm high and 2400 mm wide.
This is commonly written as 1824
· Configuration
The configuration of windows (sliding or fixed panes) is nominated by the letters X and O.
An X drawn on a window indicates the associated pane is sliding or opening.
An O indicates the pane is fixed.
So a window described as 1218XOX is a 1200 high by 1800 wide window with the two outside panels opening and the center panel fixed.
· Orientation
Windows on a drawing are considered as viewed from outside the building looking toward the window.
A window described as 1221OX, is a 1200 high by 2100 wide window with two panes.
In this example, when viewed from external, the left hand pane would be fixed and the right hand pane opening.
· Numbering
It is standard convention to start numbering from the main entry door and work clockwise around the property with a W designation indicating a window and D indicating a door.
The lower floors are completed first working up to the higher levels.
So, W1 – 2409O would represent the first window immediately to the left of the main entry door (when viewed from external) and of a size 2400 high and 900 wide with a single fixed pane.
(Most likely a side light or feature glazed panel at the main entrance)
2.2.9 DATUMS AND SPECIAL MARKS
Drawings will include important symbols or marks which establish reference criteria for correctly interpreting the drawing and the information contained on it.
For example a datum mark, Ä RL100:00, provides the reference from which all floor levels, depths, and heights are measured or referenced.
A North symbol is generally included to further enhance orientation.
Cross hatching and line type or fill have distinct meanings which allow a trained reader to accurately interpret soil types, wall structures, materials used etc.
Use the legend or get hold of the Australian Standard to help you better understand the meanings of symbols and special marks.
2.3 MEASURING QUANTITIES
To establish a budget you will need to know how to undertake basic measuring, calculations and quantity calculations as they are relevant to the construction industry.
This section has been developed to assist you in understanding methods, terminology and processes used in estimating quantities.
This section presents several components from the Nationally Accredited Unit of Competency BCG1004A – Carry out Measurements and Calculations.
We will consider five main topics:
- Metric Measurement
- Tapes and Rules
- Calculations
o Linear – length, width, thickness
o Perimeter
o Area
o Volume
- Quantities
- Costing
2.3.1 UNITS
Millimeters and meters are the basic units of measurement used in the building industry.
Lengths are described in millimeters.
The only exception to this is where dimensions on a plan of 1:200 or greater may be given as meters to two (2) decimal places.
When recording measurements and dimensions in millimeters, the following conventions are used:
- If more than four (4) digits are required, the measurement is recorded in groups of three working from right to left leaving a distinct space after each group of digits.
- When there are four digits or less, no space is used.
Generally in the building industry, there is no requirement to identify measurements by use of the words millimeter or meter or their respective abbreviations mm or m.
Therefore 7653 would represent seven thousand six hundred and fifty three millimeters.
If a measurement is given with a decimal place and no further identification is taken to represent meters.
So, 4.6 would represent four meters 600 millimeters.
When the decimal point is used to indicate the thickness of materials such as sheet metal, then the mm abbreviation must be used.
For example:
0.55mm would be used to define a sheet of Colourbond Roofing and a sheet of Villaboard may be shown with a thickness of 4.5mm.
2.3.2 Tapes and Rules
Tapes, folding rules, and straight edges or staffs used in measurement taking are in general marked in accordance with the following table, index lines at 10mm intervals and 1 meter intervals are normally included.
2.3.3 CALCULATIONS
Let’s now consider perimeter, area and volume and the way we estimate these values from drawings.
2.3.3.1 PERIMETER
The perimeter is the total length of the sides or outer boundary of a shape or a plane figure.
It is the total length of all sides.
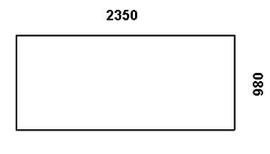
In the example above, the calculations required to determine the perimeter would be:
2350 + 980 + 2350 + 980 = 6660mm
Perimeters are the units of measurements that would be used for anything to be ordered in lineal meters, items such as:
2.3.3.2 AREA
Area is the amount of ground covered by a building, it is measured in square meters and for rectangles this is found by multiplying the length by the breadth of the structure.
The answer is normally express in square meters (m²).
Where the area of more complex shaped buildings or structures need to be calculated, we need to break the shape down into a combination of rectangles, triangles and in some instances semicircles or circles.
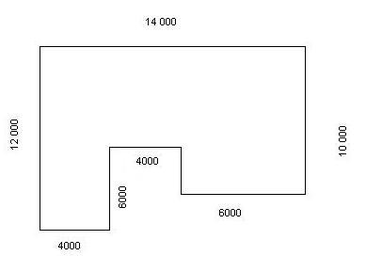
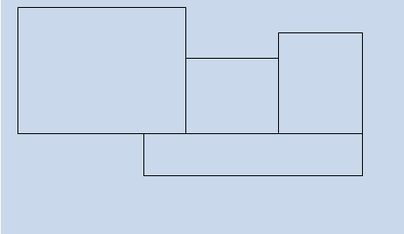
In the example below, three separate rectangles can be identified, we need to calculate the area of each one individually then add the areas to determine the total floor area.
2350 + 980 + 2350 + 980 = 6660mm
Perimeters are the units of measurements that would be used for anything to be ordered in lineal meters, items such as:
- Gutters
- Fascia Boards
- Skirting
- Architraves
- Cornice
2.3.3.2 AREA
Area is the amount of ground covered by a building, it is measured in square meters and for rectangles this is found by multiplying the length by the breadth of the structure.
The answer is normally express in square meters (m²).
Where the area of more complex shaped buildings or structures need to be calculated, we need to break the shape down into a combination of rectangles, triangles and in some instances semicircles or circles.
In the example below, three separate rectangles can be identified, we need to calculate the area of each one individually then add the areas to determine the total floor area.
- Rectangle one equals 12.0 meters multiplied by 4.0 meters
- Rectangle two equals 6.0 meters multiplied by 4.0 meters
- Rectangle three equals 6.0 meters multiplied by 10 meters
Mathematically this would be expressed by:
12.0m X 4.0m = 48m²
6.0m X 4.0m = 24m²
6.0m X 10m = 60m²
Adding these together gives the total square meter area.
48 + 24 + 60 = 132 m²
Square areas are used to determine things like:
· Paint quantities
· Floor and Wall Tiles
· Plasterboard
2.3.3.3 Calculating Floor Areas
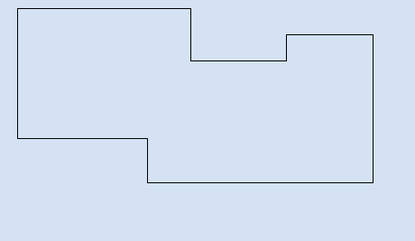
This is covered in more detail in the estimating section of the manual it is important to understand that when measuring areas, particularly off a plan, even the most complex shapes can be broken down into easily measures sections.
The house outline below may look complex or difficult to measure, but break it down into smaller sections then add the areas of each section to get a total floor area.
See the next page for how to ‘split up’ a complex shape into manageable parts for calculating floor areas.
This becomes;
This ……………….
This ……………….
2.3.3.4 VOLUME
Volume is measured in m³ (cubic meters)
Volume is measured in m³ (cubic meters)
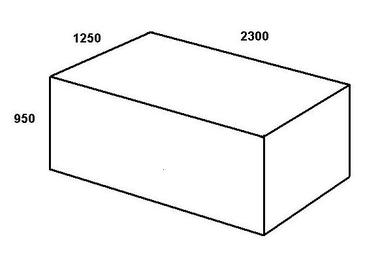
It is calculated by multiplying the length by the breadth by the height.
So in the example above, .95m X 1.25m X 2.3m = 2.73125m³
We would round this down to 2.73 meters or up to 2.8 meters if we wanted to allow for waste and over runs.
If this were a tank or storage container, then we could express the volume in terms of litre capacity.
I cubic meter can hold 1000 litres of fluid so if the shape above was a tank, it would have a capacity of 2731.25 litres.
2.3.3.5 AREA of a TRIANGLE
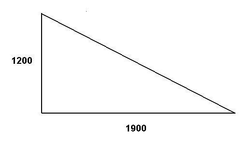
The area of a right angled triangle can be found by multiplying the two right angle sides (base and altitude) and then dividing by 2.
Therefore, for the triangle above, the area would be 1.2 meters multiplied by 1.9 meters divided by two.
(1.2 X 1.9)/2 = 1.14m²
2.3.3.6 MEASURING CIRCLES and SEMICIRCLES
The measurement of circles is sometimes required to determine the volume of round tank, concrete required in columns or piers and even in fancy paving or pathwork.
The first thing we need to consider is the use of the mathematical constant pi (p)
Pi is equal to 22 divided by 7 or rounded to 3.1416.
To determine a the area of a circle we use the formula (p)r²
Where r is the radius or half the diameter of the circle
To determine the circumference of a circle we use the formula 2pr
Pi multiplied by two times the radius of the circle.
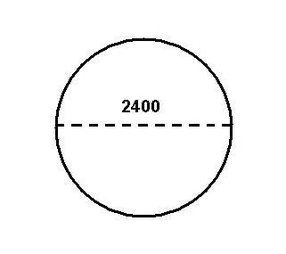
For the circle above, calculate the area and the circumference:
AREA = Pi (3.1416) multiplied by the square of the radius (1.2)²
= 3.14.16 X 1.44
= 4.53 m²
PERIMETER = 2 multiplied by 3.1416 multiplied by 1.2
= 2 X 3.1416 X 1.2
= 7.54 meters
Here are some handy quantities and costings you should know –
When ordering building materials or standard components you should think in 300mm increments. To explain what is meant by this –
Standard windows are 600mm – 900mm – 1200mm – 1500mm – 1800mm. This applies to height and width.
Ordering windows outside these parameters will cost a lot more money.
Timber comes in lengths of 900mm – 1200mm – 1500mm – 1800mm – 2400mm and 2700mm up to 5.4 meters.
Timbers in section can vary, i.e. 90 x 35mm – 70 x 35mm – 100 x 50mm. You will need to read the sectional sizes from your plan.
When cutting timber on site it is a good idea to spray the cut end/s with a termite resistant spray and also to paint the end with a primer to resist rot and splitting.
How many decking boards will you need if the deck is 10 metres long and 5 metres wide?
If the boards are each 80mm x 19mm in section, that’s 10M or 10,000mm divided by 80.
Let’s do the exercise! Using your calculator, that equals 125 boards @ 5.1M.
You will notice that I did not allow for shrinkage.
However, if you wish to deduct say 2 @ 5.1M, that’s up to you.
Bricks:
Bricks are normally purchased per 1,000.
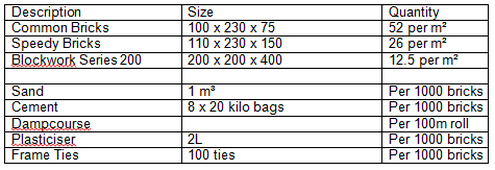
A standard face brick or common brick measures 110 x 75 x 230 which constitutes around 52 bricks per M2.
Calculate that your wall in square meters;
Say - 2.5M high and 15M in length.
Therefore
15 x 2.5 = 37.5M2 x 52 bricks per M2 = 1,950 bricks.
You may have a sliding door in the wall which measures 2100 x 2400.
You can deduct this from your brick total.
Let’s do it!
2.1 x 2.4 = 5.04
Deduct this from our total wall M2 37.5M2 (as above)
Say, minus 5.00M2
32.5M2
So, 32.5M2 X 52 bricks per M2 = 1,690 bricks or say 1,700 bricks to construct that one wall.
Tip:
Calculate your total number of bricks for all walls. Allow for some wastage, say 5%.
When you establish your total, ‘phone the brick company and check their pallet quantity loading and order the correct number of pallets.
Remember – bricks and finishes can vary from company to company, for example Quick Brick or Ezy Brick might be double the size of a standard brick.
Therefore you would only need 26 bricks per M2. Don’t forget to allow for wastage.
Concrete blocks (200 Series, i.e. 200 x 200 x 400):
It takes 12.5 blocks per M2 and costs around $3.00 per block.
Cost for laying is approximately the same, i.e. $3.00 per block.
When a bricklayer gives you a price it could be calculated either per 1,000 laid or it might be a price per brick or block.
Ensure you listen closely to, and/or read carefully, his/her quotation.
Normally the sand and cement for the mortar is included in the labour price – however check this.
Don’t forget that extras may occur – eg. sill bricks to doors and windows, cut bricks to bay windows, raked joints, ironed joints, flush joints, coloured mortar, scaffolding, lintels, frame ties, corbels, face finishes.
These can all add to the basic costs – check with your bricklayer.
Establish just what is and what is not included in his/her quotation.
Concrete:
If you are not an experienced concreter and you don’t have the tools/equipment, don’t even think of doing your own concrete.
Small garden shed slabs, pathways, pool pump plinths are fine for you to tackle (maybe), but remember – what looks easy is often not.
As well as the importance of the correct preparation, skill in placing and timing is critical when pouring a house slab.
My advice would be “simply, don’t do it!!”
Normally concrete has a consistency of 4:2:1 ratio, i.e.
4 parts stone
2 parts sand
1 part cement
It must not be dropped higher than 1M or the constituents of the mix will separate and lose its strength which is generally 20 to 25mpa.
It normally has what is called an 80mm slump, which is the viscosity of the pour.
Do not add water or it will lose its strength, and if random tested by the testing laboratory of C.S.R.I.O. (rare but not unheard of) you would be told to pull the slab out and do it all again. And that could break the bank.
Concrete calculation –
Slab – M3 = Lx B x H = M3
20x12 x .100 = 24M3
Footing – M3 = L x B x H = M3
2 x 20 + 2 x 12 = 54 linear metres (perimeter of building)
Now, take depth and width of footings, say 400mm x 500mm x linear metre.
Eg. Cubic metres 54 linear metres x .4 x .5 = 10.8M3
It is better to order a little more than not have enough, particularly in an afternoon pour.
Your preparation and sand leveling is critical.
Don’t forget your under slab drainage, pest barrier treatments and membrane.
ORGANISE YOUR STEEL INSPECTION BEFORE YOU POUR.
Roofing:
Like so many things, it looks simple but there are obvious correct procedures and practices.
For estimating purposes in an uncomplicated roof design, eg. a flat, skillion or gable roof you need to establish the correct length, i.e. measure from the ridge or apex, down the length of rafters and allow 40mm – 50mm into the guttering.
If you know the length (as above) it is simple to find out how many sheets you require. Simply divide the length of the roof frame, gable to gable, and divide it by 762mm. This is the effective cover per sheet of standard Custom Orb.
So, if the roof length measures 22M, that’s 22,000mm divided by 762 which equals 28.87 sheets – say 29 sheets x whatever your previous length of rafter and gutter overhang was.
How many screws or fixings will you need?
Allow around 12 fixings per M2 (slight over-kill).
Let’s look at an example gable roof –
22M long x 5.1M measured along length of rafter
22M = 29 sheets @ 5.140 x 2 (2 sides)
= 58 @ 5.140
Colorbond “Dune” – plus fixings
Calculation 22 x 2 x 5.140 = 226.16M2
Allow 12 fixings per M2
226 x 12 = 2714 fixing
Don’t forget to allow for your insulation blanket – 50mm Anticon at around $6.00 per metre, laid.
Listed below are supplementary weatherings that you may need to complete your roofing –
Ridge capping Valleys
Gutter Fascia
Apron flashing Barge capping
Down pipes Outlets
Brackets
The units of measurements used for these will be lineal meters with the exception of outlets and brackets which would be ‘each’.
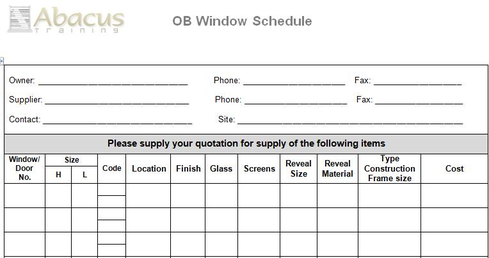
2.4 WINDOW and DOOR SCHEDULE
The Window and Door Schedule is provided to allow for easy reference during estimating and tendering phases, it can also form the basis of an acceptance document on delivery.
It is a simple form, laid out to allow easy data entry direct from the plans and specifications.
In an earlier section, we discussed the conventions for nominating door and windows in respect to:
- Location
- Size
- Configuration
Special windows configurations may require additional explanatory notes, take care and discuss your needs with prospective suppliers.
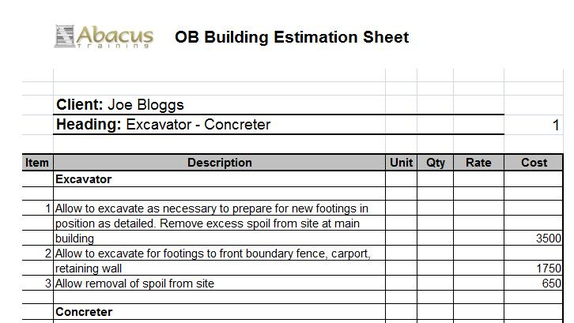
2.5 ESTIMATING SHEETS
Estimating or collection sheets are used to gather information on the components involved in the building process.
They are identified by trade or service and are formatted to provide the organised collection and entry of data.
In their simplest form they are static with calculation being completed manually.
Automated spreadsheets collection sheets have been developed and form part of some of the sophisticated estimating software packages that are available and in use by some professional quantity surveyors.
These automated systems recognise building product and or element codes, drawing amounts and prices from associated databases and completing the calculations automatically.
As simple or sophisticated as the system may be they all follow the following basic layout as detailed below.
A tutorial is provided and accessible from the project management files you have downloaded.
2.6 PC ITEMS
PC Items are those fixtures which connect directly to a service such as water or electricity and include:
- Dishwasher
- Laundry Tubs
- Range Hoods
- Kitchen Sink
- Vanity Basins
- Toilet Suites
- Hot Water Service
- Cooktops
- Wall Oven
Sending a complete list to your supplier may means real savings in buying a ‘house lot’.
Another consideration is the opportunity to install appliances and PC’s built by one manufacturer, rather than mix and match.
Whilst shopping around on individual items may save you some money, walking into a kitchen that is fitted with a common manufacturer of all appliances can certainly give the impression of a quality job.
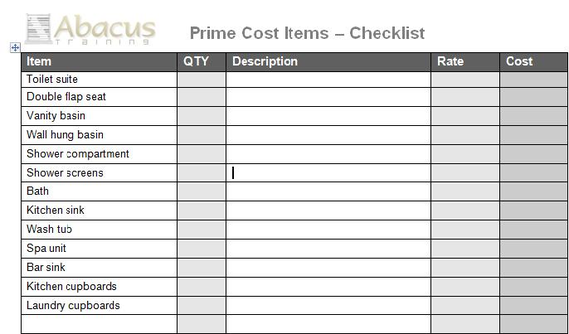
Use the checklist provided to ensure you allow for all PC’s as required, and identify any special design impacts that your chosen fixtures may cause such as water at the refrigerator or additional spacing between overhead cupboards at the cooktop to accommodate the extra large range hood you have specified.

